How to shoot the Moon!
Photographing the moon can be a challenging but rewarding experience for any photographer. With the right equipment and techniques, it's possible to capture stunning shots of our celestial neighbor. In this post, we'll go through the steps you can take to photograph the moon with a DSLR or mirrorless camera.
Gibbous Moon taken fairly high overhead to minimize air disturbance.
D7500 + 150-600mm Tamron - 1/400s @ f/8, ISO 100 and 600mm focal length. (cropped in)
We will focus on shooting a basic shot of the moon, nothing fancy. Much more can be done around planning a Moon shoot, such as incorporating foreground elements and shooting in blue or golden hours. Here we want to take you through the steps to get a solid, sharply focused shot of the moon in the night sky.
What do you need?
Equipment needed:
A DSLR or mirrorless camera with manual settings
A telephoto lens (200mm or longer)
A sturdy tripod
A remote shutter release (optional but recommended)
When considering focal length, if you want a more detailed shot showing the Moon’s surface features, the longer, the better. The longer the focal length, the more “zoom” you get, and the more the Moon will fill your frame. You can always crop in afterward, but it may lose some sharpness and detail. I usually find that a 300mm lens is a good starting point, and plenty of kit lenses allow you to reach that focal length.
If you’re shooting a crop sensor camera, you’ll also want to incorporate the crop factor into your focal length. For instance, a Nikon APS-C has a 1.5x crop factor, so a 300mm lens is effectively 450mm (300 x 1.5). So, you’ll get a bit more reach with a crop sensor than a full frame.
Taking the Shot
Moon phases as seen from Earth. (Wikimedia Commons)
Step 1: Plan your shoot. Before heading out to shoot the moon, it's important to plan your shoot. The moon's position changes throughout the month, so it's a good idea to use an online lunar calendar to determine when the moon will be in the desired phase and position in the sky. You'll also want to choose a location that has a clear view of the moon and minimal light pollution.
You can look up the current Moon phase and rise and set times for your location here: https://www.timeanddate.com/moon/usa/albuquerque. (this is for Albuquerque, NM, where I live). You’ll also want to plan to shoot the moon near its highest point in the sky. Shooting the Moon when it’s on or close to the horizon means you’re shooting through more atmosphere (air), softening the focus and making it harder to capture detail.
While getting away from city lights will help reduce light pollution and capture more detail, it is NOT a requirement. The Moon is extremely bright, and you should be able to get a good shot even from your backyard or terrace. Many of my shots are from my backyard here in the suburbs.
Step 2: Set up your gear. Once you've found a suitable location and time to shoot, set up your gear. Attach your telephoto lens to your camera and securely mount it onto your tripod. Make sure your camera's settings are set to manual mode, and turn off any image stabilization features on your lens.
I use a Robus RC-5570 Carbon Fiber tripod and an RRS BH-40 ball head for getting a stable setup for minimal shake and vibration.
The goal here is to ensure that when your camera takes the shot, there are fewer ways to get camera shake that may blur the photo. Sturdy tripods with a stable camera attachment help to reduce any shake you might get trying to handhold a shot. Turning off any IR/VR stabilization in your lens keeps those stabilization motors from creating unnecessary vibrations.
And if you’re using a remote shutter release, make sure that’s plugged into the right port on your camera if it’s wired. As an alternative to a remote shutter release cable, you could also use your camera’s built-in self-timer set to 5 seconds or longer. Again, the goal here is to reduce any camera shake or vibrations caused by pressing the shutter button on the camera.
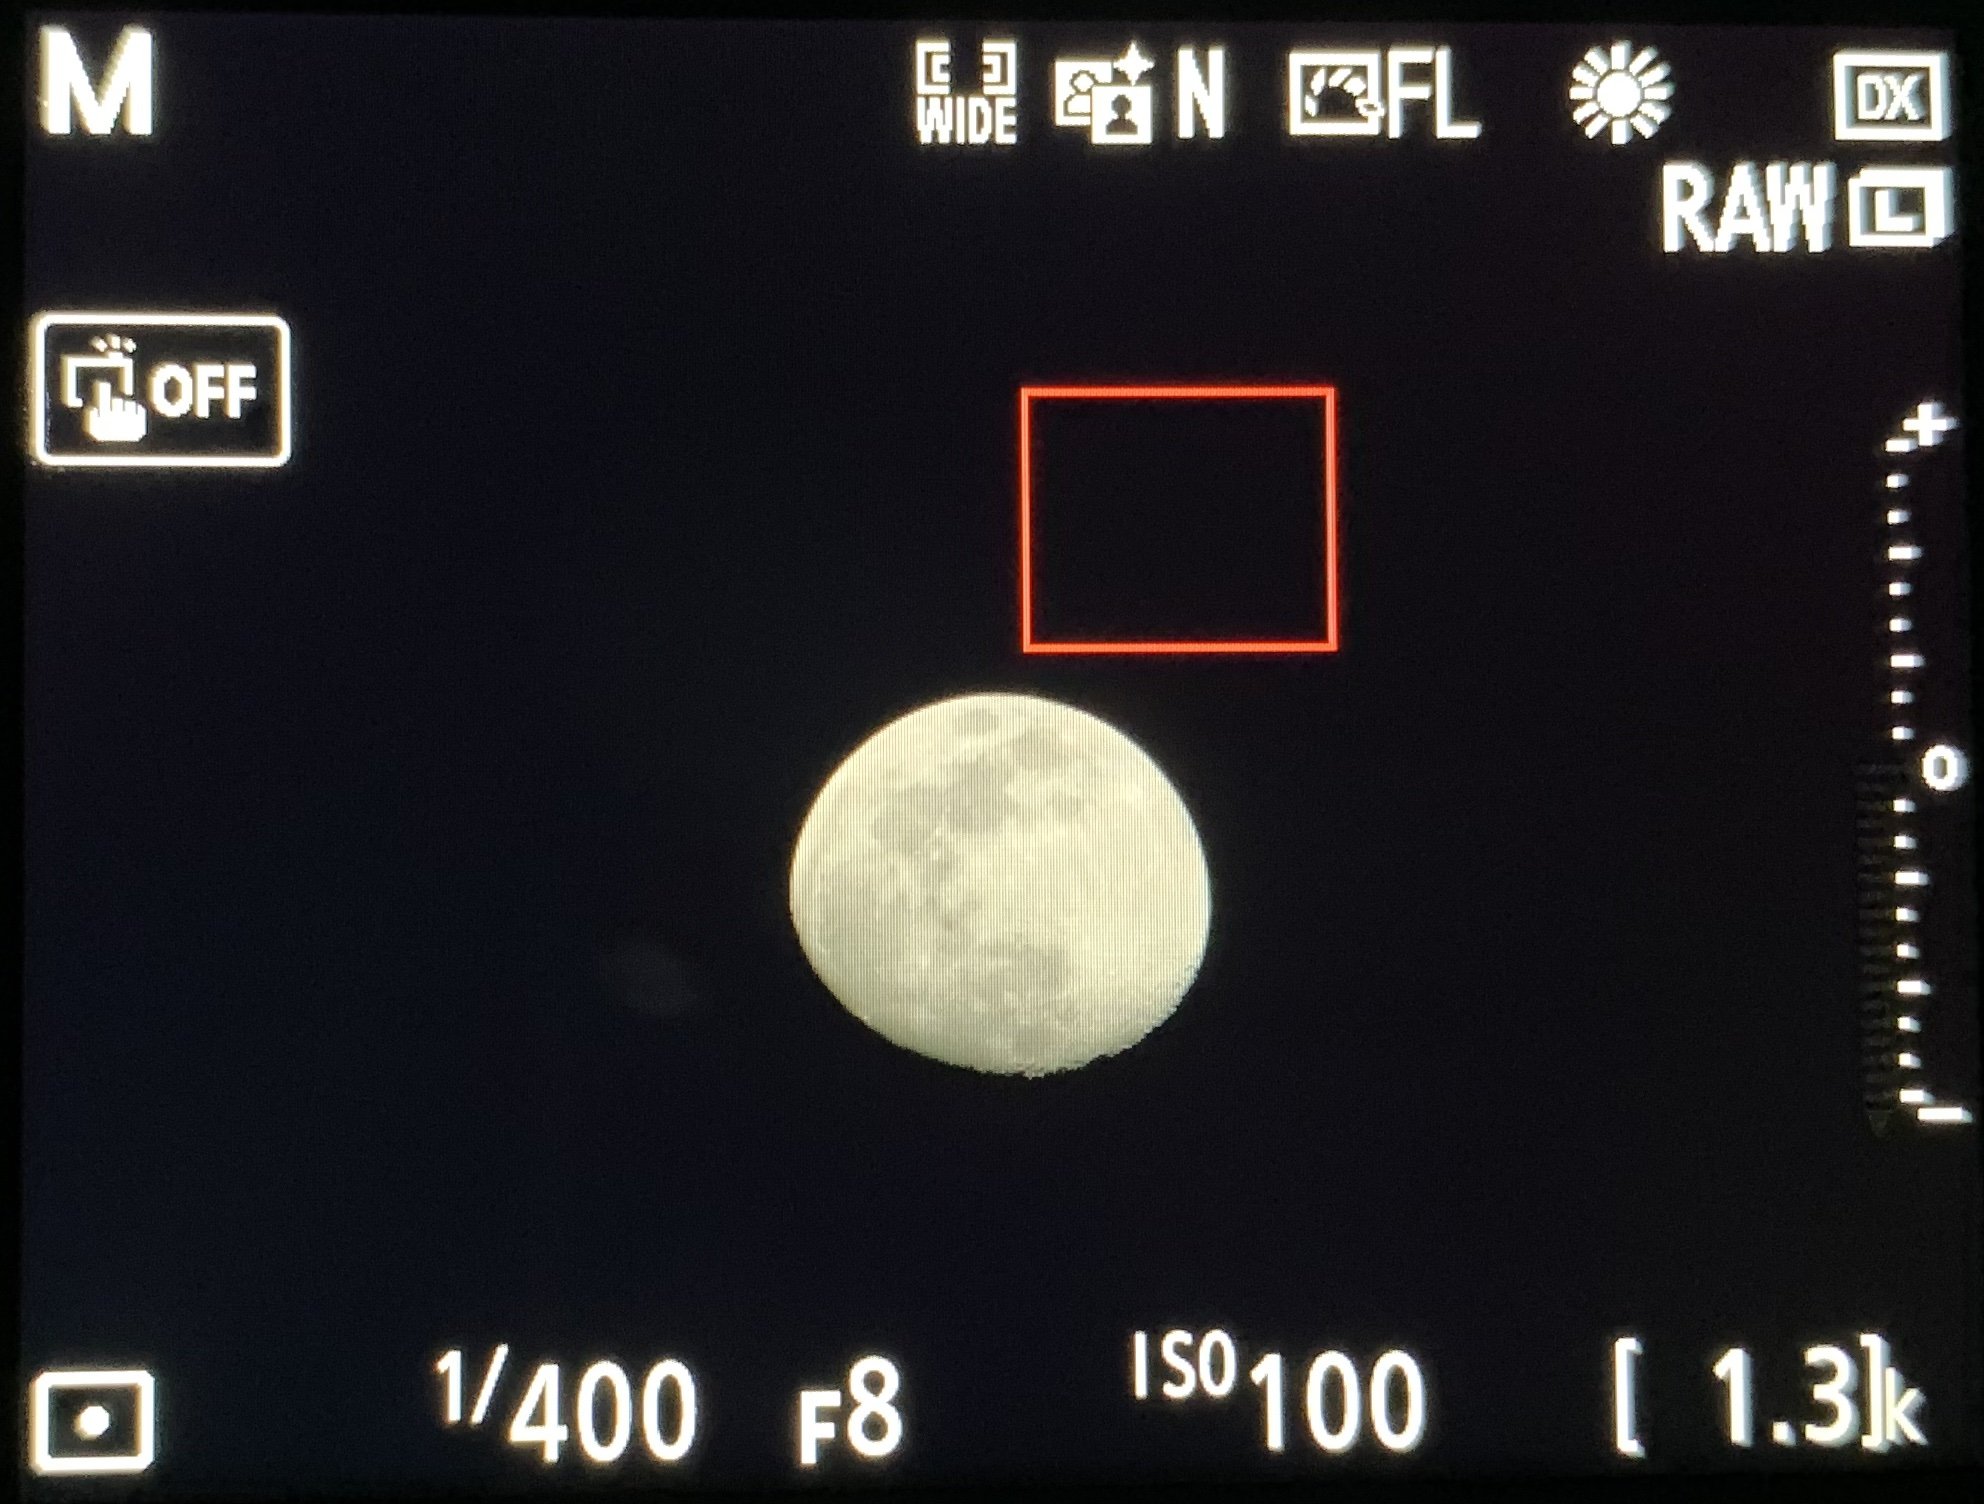
My Nikon D7500 in Manual mode with 1/400s shutter speed, an aperture of f/8 and ISO of 100 shooting a fairly bright gibbous moon.
Step 3: Adjust your camera settings. You'll need to control your camera settings manually to get the best possible shot of the moon. Start by setting your ISO to its lowest setting (usually ISO 100 or 200) to reduce noise in your images. Set your aperture to a medium-high f-stop number (f/8 to f/11 is a good range to try) to increase depth of field while keeping the moon in focus. Finally, set your shutter speed to a fast setting (around 1/125th of a second or faster) to prevent any blurring from camera shake.
As stated earlier, the Moon is very bright. So, even though you’re shooting at night, you can use much faster shutter speeds. Depending on the phase of the Moon, you’ll need to adjust the shutter speed up or down to get the right exposure (brightness) to capture details. And the Moon is also moving across the night sky, so having too low a shutter speed will cause blurring due to the Moon’s motion. You can generally avoid most movement with shutter speeds at 1/6s or faster. But the faster your shutter speed, the more likely you will get sharp, detailed photos.
Step 4: Focus on the moon. To focus on the moon, switch your lens and camera to manual focus mode and zoom in on the moon using your viewfinder or live view screen. Use the focus ring on your lens to adjust the focus until the moon appears sharp and clear. If you're having trouble getting the focus just right, try using the magnification feature on your camera to zoom in even closer.
The infinity focus mark on a lens isn’t always where that lens focuses to actual infinity.
Manually focusing on the Moon can be finicky at first. You will be manually focusing your lens at infinity, which isn’t necessarily at the infinity mark (∞) on your focus ring. You can start at your focus ring’s infinity marker and slowly adjust to either side of it until you find sharp focus and contrast. You can mark this spot on your lens, which might make it faster to find focus when you shoot the Moon again.
Another method for finding focus is using autofocus initially and then switching to manual focus. Autofocus on your camera works by finding the edges where there is contrast and focusing until those edges are sharp. If you have a fairly bright Moon, any phase between Waxing and Waning Gibbous, you should have enough brightness and surface contrast to try and use autofocus. With your lens and camera body set to autofocus mode, set your focus point on a portion of the moon with an area of high contrast and half-press the shutter button or tap the live view to autofocus. If it succeeds and the focus is sharp, at that point, without touching the focus ring on your lens, switch your lens and camera back to manual focus. Once there, don’t adjust or touch your focus ring, and the Moon should stay in sharp focus for the rest of your shoot.

I use a Flashpoint intervalometer as a shutter release. Be sure to get one that has the right connection for your particular camera.
Step 5: Take the shot. Once you're happy with your camera settings and focus, it's time to take the shot. Use a remote shutter release (or the self-timer feature on your camera) to trigger the shutter and prevent any camera shake. Take multiple shots at different exposure settings to give yourself some options when it comes to editing your images.
If using your camera’s built-in self-timer, I would suggest using a 5-second or longer setting to avoid as much camera shake or vibration as possible. Most modern DSLRs and Mirrorless cameras have a self-timer feature. Use your camera’s manual to figure out how to turn yours on and set it.
Step 6: Edit your images. When you're done shooting, it's time to edit your images. Start by adjusting your images' exposure, contrast, and brightness to get the look you want. You can also crop your images to remove any unwanted elements and focus on the moon itself. I use Lightroom Classic for editing, but there are numerous choices depending on your budget and computer’s operating system.
Using Lightroom Classic on a Mac to edit a Moon shot. In the “Basic” panel on the right you can use those sliders to adjust white balance, exposure, and saturation properties until you get the creative look you’re going for. Other editing software will have similarly named adjustments available.
You can shoot in RAW format or JPEG successfully. However, if you want the most control over white balance and other photo properties, shooting in RAW will give you an advantage over JPEG. But you can still edit JPEG images in a photo editor to some extent and get the desired results. Maybe I’ll do a future article on how to post-process Moon photos, but just adjusting the white balance, exposure, and contrast should give you enough creative control in the beginning if post-processing is new to you.
In conclusion, photographing the moon can be a rewarding experience for any photographer. With the right equipment and techniques, capturing stunning shots of our celestial neighbor is possible. Happy shooting!